
Steps to migrate Lucene to Solr
- Disable the Lucene config files under the <wesite>/App config/include/ folder by adding the “.disable” extension to the below files.
| SNO | File Name |
| 1 | Sitecore.ContentSearch.Lucene.Index.Analytics.config |
| 2 | Sitecore.ContentSearch.Lucene.Index.Core.config |
| 3 | Sitecore.ContentSearch.Lucene.Index.Master.config |
| 4 | Sitecore.ContentSearch.Lucene.Index.Web.config |
| 5 | Sitecore.ContentSearch.Lucene.Indexes.Sharded.Core.config |
| 6 | Sitecore.ContentSearch.Lucene.Indexes.Sharded.Master.config |
| 7 | Sitecore.ContentSearch.Lucene.Indexes.Sharded.Web.config |
| 8 | Sitecore.ContentTesting.Lucene.IndexConfiguration.config |
| 9 | Sitecore.FXM.Lucene.DomainsSearch.Index.Master.config |
| 10 | Sitecore.FXM.Lucene.DomainsSearch.Index.Web.config |
| 11 | Sitecore.ListManagement.Lucene.Index.List.config |
| 12 | Sitecore.ListManagement.Lucene.IndexConfiguration.config |
| 13 | Sitecore.Marketing.Definitions.MarketingAssets.Repositories.Lucene.Index.Master.config |
| 14 | Sitecore.Marketing.Definitions.MarketingAssets.Repositories.Lucene.Index.Web.config |
| 15 | Sitecore.Marketing.Definitions.MarketingAssets.Repositories.Lucene.IndexConfiguration.config |
| 16 | Sitecore.Marketing.Lucene.Index.Master.config |
| 17 | Sitecore.Marketing.Lucene.Index.Web.config |
| 18 | Sitecore.Marketing.Lucene.IndexConfiguration.config |
| 19 | Sitecore.Social.Lucene.Index.Analytics.Facebook.config |
| 20 | Sitecore.Social.Lucene.Index.Master.config |
| 21 | Sitecore.Social.Lucene.Index.Web.config |
| 22 | Sitecore.Social.Lucene.IndexConfiguration.config |
| 23 | Sitecore.Speak.ContentSearch.Lucene.config |
- Enable the Solr config files under the <wesite>/App config/include/ folder by removing the “.example” extension to the below files
| SNO | File Name |
| 1 | Sitecore.ContentSearch.Solr.DefaultIndexConfiguration.config |
| 2 | Sitecore.ContentSearch.Solr.DefaultIndexConfiguration.Xdb.config |
| 3 | Sitecore.ContentSearch.Solr.Index.Analytics.config |
| 4 | Sitecore.ContentSearch.Solr.Index.Core.config |
| 5 | Sitecore.ContentSearch.Solr.Index.Master.config |
| 6 | Sitecore.ContentSearch.Solr.Index.Web.config |
| 7 | Sitecore.ContentTesting.Solr.IndexConfiguration.config |
| 8 | Sitecore.FXM.Solr.DomainsSearch.DefaultIndexConfiguration.config |
| 9 | Sitecore.FXM.Solr.DomainsSearch.Index.Master.config |
| 10 | Sitecore.FXM.Solr.DomainsSearch.Index.Web.config |
| 11 | Sitecore.ListManagement.Solr.Index.List.config |
| 12 | Sitecore.ListManagement.Solr.IndexConfiguration.config |
| 13 | Sitecore.Marketing.Definitions.MarketingAssets.Repositories.Solr.Index.Master.config |
| 14 | Sitecore.Marketing.Definitions.MarketingAssets.Repositories.Solr.Index.Web.config |
| 15 | Sitecore.Marketing.Definitions.MarketingAssets.Repositories.Solr.IndexConfiguration.config |
| 16 | Sitecore.Marketing.Solr.Index.Master.config |
| 17 | Sitecore.Marketing.Solr.Index.Web.config |
| 18 | Sitecore.Marketing.Solr.IndexConfiguration.config |
| 19 | Sitecore.Social.Solr.Index.Master.config |
| 20 | Sitecore.Social.Solr.Index.Web.config |
| 21 | Sitecore.Social.Solr.IndexConfiguration.config |
| 22 | Sitecore.Speak.ContentSearch.Solr.config |
- Install the Bitnami for Solr software. You can download it from the below URL.
https://bitnami.com/stack/solr/installer#windows
Note: Please check the supported version of the SOLR with respective to the Sitecore version which you are using.
Below one is the URL for SOLR compatibility table
https://kb.sitecore.net/articles/227897
4. Create the cores under solr folder(\solr-6.6.0-0\apache-solr\server\solr) with the name of indexes in our project.
- Let’s create a Sample core folder
Create a core:
- For example, I’m going to create the core as a name it as “XYZ_search_index”.
- Extract the above file and Copy the folder under it and place it in the Solr instance folder (\solr-6.6.0-0\apache-solr\server\solr)
- Change the folder name as an appropriate index name which you are going to create. It should be matched with the “<paramdesc=”core”> $(id)</param>” property. It should match with the index id if param desc contains the $(id). In my case param desc as “id” so I need to create the core name as index id.
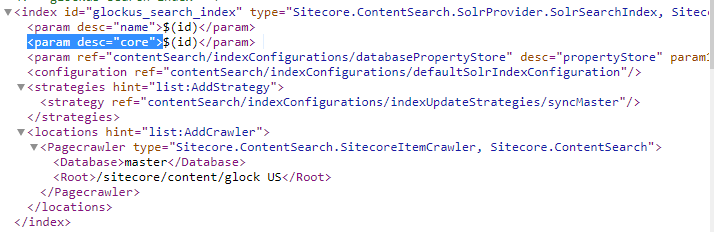
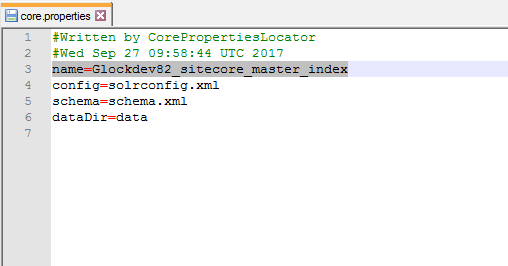
- Open the core folder and edit the “core.properties” file. Change the “name” property with the appropriate index name which you are going to create.
- Like that we need to create the list of indexes which are having in our solution. You can find the indexes in our solution by browsing ShowConfig page.
Browse the HTTP://<Your Sitecore instance>/sitecore/admin/showconfig.aspx. Here you can find the tag “<indexes hint=”list:AddIndex” patch:source=”Sitecore.SearchIndexes.config”>”, under this you find <index tags. Those many indexes need to be created. Be patience a lot of repeated steps to perform.
- Let restart the Solr server after completion of creating the cores task.
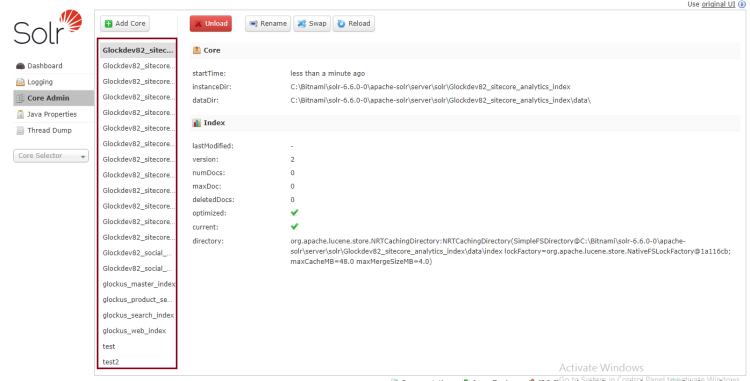
- Browse the Solr server(http://localhost:8983/solr/) and you can find the cores which you are created before. Please check below screenshot.
- Now open the “\Website\App_Config\Include\Sitecore.ContentSearch.Solr.DefaultIndexConfiguration.config” file and change the Solr base address by update the “ContentSearch.Solr.ServiceBaseAddress” property.
<setting name=”ContentSearch.Solr.ServiceBaseAddress” value=”http://localhost:8983/solr” />
Note: Make sure the Solr base address URL must not end with “/” character.
- Rebuild the indexes from Sitecore by goto the Sitecore control panel -> click on indexing manager -> Select all -> Click on the build.
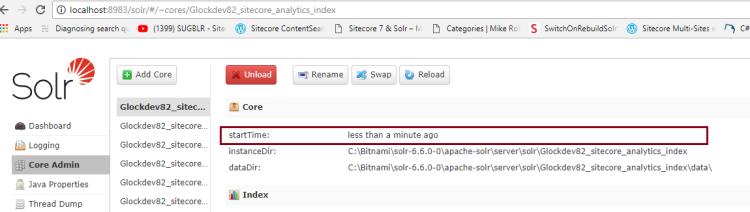
- If everything builds successfully then go to the core of the Solr server. There you can check the last update of the core.

Nice One
LikeLiked by 1 person
Thanks
LikeLiked by 1 person
Really nice article
LikeLiked by 1 person